These pictures taken by Ruud Staneke.


The Leopard Armored Family
Any questions, comments, or problems, please email me.
Leopard Bridge Layer Leopard 1 Engineer Leopard 1 Recovery
Leopard 1 PRTL Leopard C2 Leopard 2 Trainer Leopard 2A4
Leopard 2A4 Demonstrator Leopard 2A5 Leopard 2 Recovery
Leopard
Bridge Layer
These pictures taken by Ruud Staneke.


Leopard 1
Engineering Vehicle
Leopard 1 AEV in
Action Leopard 1
Walk Around
Gert's
Leopard 1 Photos
These pictures taken by Ruud Staneke.


Leopard 1
PRTL (Pantser Rups Tegen Luchtdoelen)
These pictures taken by Ruud Staneke.
Tank, air attack with 2x 35mm canons


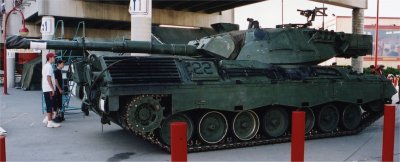
Leopard C2
(Canadian)
Dan Hay's Leopard C2 Walk Around
Leopard
2 Trainer
Marcel's Leopard 2 Trainer Photos Hartwig's
Leopard 2A4 Fahrschulpanzer

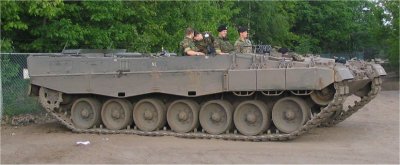
Leopard 2A4
Arnd's
Leopard 2A4 Pictures Caela's Norwegian Leopard
2 Photos
Sascha's Leopard 2A4 Mini Walk Around Leopard 2A4 Power Unit Change
Leopard 2A4 Off-loading from Transport Robert's Complete Dutch Leopard 2A4 Walk Around
Polish Leopard 2A4 Photos by Clemens Austrian Leopard 2A4 Photos by Vojta
These pictures taken by Arnd Baumgardt


Leopard 2A4
Demonstration Vehicle
Marcel's
Leopard 2A4 Demo Vehicle Pictures
Robert's Leopard 2 Demo Vehicle Walk Around
Leopard 2A5
Arnd's Leopard 2A5 Pictures
And one more from Arnd
These pictures taken by Ruud Staneke.


Leopard
2 Recovery Vehicle
Arnd's Leopard 2 Recovery Vehicle Pictures
Gert's
Leopard 2 Recovery Vehicle Photos
Dutch Leopard 2 Buffel Photos by Ulrich Wrede Leopard 2 Buffel Photos by Peter van Iren
These pictures taken by Ruud Staneke.


